My Instagram Feed

Thursday, September 30, 2010

Vintage Hairstyling


I think I fell in love with vintage style, namely 30's & 40's, when I was maybe 13...as soon as I saw the movie Swing Kids. The clothes, the dancing, the music; everything about it is beautiful and inspiring! The care everyone took in their clothes and hair is something to admire. I think it also (probably falsely in most cases) conjures up a feeling of innocence and simplicity, if you forget about the whole World War II thing...I've always wanted to learn how to do my hair in those styles. Since re-runs of The Wonder Years, I've branched my love of vintage into the 60's too.

I've been using hot rollers for a few years now, but kind of making things up as I go. In the past I would try to find rolling patterns online, but those aren't easy to come by. I drew up my own sketches to work from by what I learned by trial and error. I do have a copy of a hard to find, and expensive book, called 1940's Hairstyles, by Daniela Turudich. I've seen it sell for over $400 (but I just looked on ebay, and there are a few, as well as on amazon). I didn't find it that easy to follow, not knowing many techniques myself, and I haven't had the time to perfect any basics. Plus, some of those 40's styles are quite dramatic, and I wanted something I could do for less formal day-to-day things.

So, I bought myself the book Vintage Hairstyling. Sadly, I've had little opportunity to actually try anything with any great effort yet. This book was a great purchase though, because it explains things very clearly. Vintage Hairstyling has a large range of styles too, from 30's to 60's, and is very easy to come by and not expensive. It has great step-by-steps, so all I need to do now is pick up a few more products to get going...


Read more...

Sunday, September 26, 2010

Biscuits & Chili

I'm a huge fan of a quick and easy meal these days. We're working so hard on our little side project (seat upholstery) I don't have any spare time. I mean it. 1 day off in 8 weeks. I work EVERYDAY. Not always a full day on weekends, but a few hours at least. I'm wearing thin, but I refuse to go back to the bad habit of frozen dinners. I think they helped put me in the hospital in April. This is a favorite anyhow, and my love rekindled when we were in Canada. A friend had a chili cook-off, and we each brought our version of chili along. It was amazing! Everyone had a different interpretation, and all were so good! I still use my own basic recipe, but I've since been adding the things I like from the other recipes. I add either brown sugar, or molasses, or a combination of the two. I also add more vegetables, and I get a few toppings ready as well. And baking biscuits to go along makes for such a comforting meal.


Chili Recipe:  Here is my original chili recipe, but in this photo, I added a can of corn, and about 2 tbsp of brown sugar. I've also done 1 tbsp of brown sugar, and 1 tbsp of molasses in the past. Other roast veggies can be added too. I sometimes chop up some red pepper (red capsicum, for the aussies) and saute it with the onion and garlic and add it to the beef. I also regularly change up the beans too. This recipe in the photo I added a 4 bean mix, instead of chick peas, since Hubby hates chick peas. This chili recipe can feed us for at least 3 meals. I freeze left overs in 2 containers.

Toppings: This is the fun part. So many options! These are my favorite, but any more ideas are appreciated...
-Sour Cream
-Shredded cheese (I used cheddar and mozza)
-Diced green onion
-Avocado slices
-Tortilla chips

Biscuit recipe: I used the recipe from here. I half this recipe for just me and Hubby. Lots of left over biscuits are not so good.

Read more...

Thursday, September 16, 2010

Caramel Apple Cider

Since it's been *winter* here (20°C days, 10° nights, so cold, right? Ha!) I do the comforting winter things I miss from not being in Canada. I wear scarves (you'd never, ever really need one), I have worn gloves (ridiculous and embarrassing for a Canadian) and wear my thick fleece PJ's (do-able. But you wake up sweating like a pig).

One thing I miss is Starbucks. They have them here, but believe it or not, I'm pretty sure I don't live within 100kms of one. I've checked. I think Brisbane is the closest they come to me. And, they don't even sell all the wonderful comforting drinks like they do in North America! My favorite one is the caramel apple ciders. So, I make them myself....


Caramel Apple Cider

Ingredients:
1.5 litres apple juice
1/4 tsp cinnamon
1/4 tsp ground cloves
1/4 tsp nutmeg
1/4 tsp all spice

Bring all ingredients to the boil, and simmer for as long as you want. I sometimes add another cup of water to the mixture to allow for the reducing. Also, all those flavours can be quite strong, so adding water makes almost no difference to flavour.

Ingredients:
Whipped Cream
Hershey's Caramel Topping***.

So simple, just poor yourself a cup of hot apple cider, top with some stiff whipped cream, and drizzle on some caramel sauce. Such a comforting treat!


***Australia also does not have Hershey's readily available (and if you do find some, it's usually in specialty shops where a small package of kisses costs you $8!!). I had to get my mom to send me some, and then on our recent trip, I brought back a few more cans. But I've made my own before, and it was lovely. Here is the recipe.

Read more...

Tuesday, September 14, 2010

Marshmallow Butterscotch Squares

Ok, I'm back...for now...if there's anyone still around (besides you Mom! I love you!)...??

We've been back from Canada now for something like 6 weeks, and the butterscotch chips I loaded my luggage up with are burning a hole in my...fridge (?), so I decided to make a childhood favorite for old times sake. I LOVE these things. So simple, so sweet, so addicting. I did a half recipe, so I could stretch my precious butterscotch chips even further.


1/4 cup butter
1/2 cup peanut butter
1/2 bag butterscotch chips (a little more than 1/2 cup, I think)
mini marshmallows

Melt the butter and peanut butter in a double boiler, or whatever (microwave). Take off the heat, and stir in butterscotch chips until completely melted. If you need to get the mixture hotter to melt all the chips, very carefully re-heat. Those chips will harden if they get too hot, so best to let them melt as slowly as possible. Leave mixture to cool for about 15 minutes. Then mix in marshmallows. Australia doesn't have mini marshmallows** like North America does, so I used a bag of jet-puffs, (which they also don't have here, but were brought over for me with my sister when she came in March), cut into small pieces*. Pour into a 8" square pan lined with baking or wax paper, and put in the fridge to cool completely. Once cool, cut into squares.

*Handy Hint. When you need to cut marshmallows (do you ever? I do, for some reason...) I use a cheese knife, you know, the one with the holes in the blade a dab the fresh wounds with icing sugar. Works a charm!

**UPDATE: They DO have mini marshmallows! I found some! I've never seen them until my last grocery trip! They are in the baking isle, near the choc chips. The big ones are in the candy isle.

When I was looking for this recipe, I saw a variation to just use regular chocolate chips (instead of butterscotch), so I did one version like that too. Not as good, but still so good! You just substitute choc chips for the butterscotch. I used semi-sweet, so milk would probably be really sweet.

 Now I have all these other ideas, like adding Rice Krispies and peanuts too...

Read more...

Friday, August 13, 2010

Hiatus

Well, I guess I went on a *little* hiatus there didn't I? I didn't mean to, I even have 4 drafts of other posts I was planning to do! Shortly after my last post, I ended up in the hospital again, and was there for 5 days. This all happened a few weeks before we were to leave to go to Canada, and also right in the middle of a stressful time in starting up a new business...a little side thing, that kind of ended up being a lot more demanding...I ended up having to rest and recover for almost another week, and that left one week to pack up our entire apartment contents to make room for the sub-letter we had coming in. I was also not allowed to lift anything over 2kg. It was the second most stressful time in my life. Anyhow, we made it to Canada, and I then decided spending as much as possible NOT in front of the computer made the most sense to me. I had so many people to catch up with, and so many things to make sure I did while I was there....Now, I'm not even sure I want to keep this up. It's kinda fluffy and pointless, my blog is. I thought I would be able to do lots of fun things on here, but there are too many other good blogs out there to even bother with this, as it is, I'm thinking. So, I have some thinking to do...

Read more...

Saturday, March 27, 2010

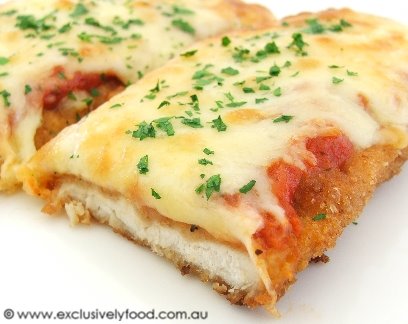
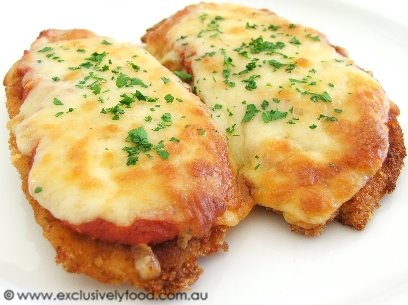
Chicken Parmigiana

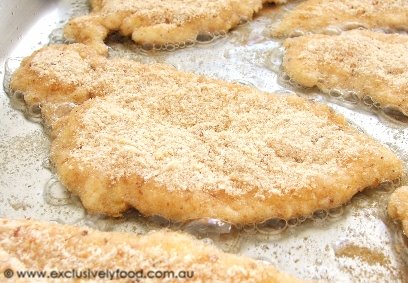
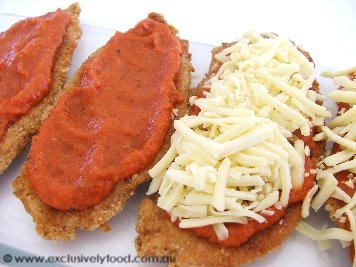
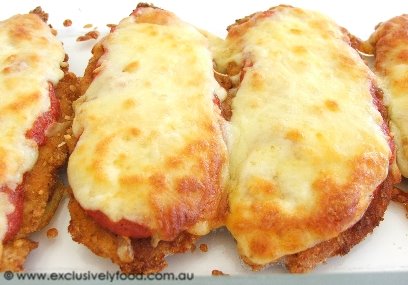
Sometimes Hubby looks up recipes for me to make. I get bored of our staples (mainly Mexican & Italian variations), and he came across this gem. It was perfect, as I had all the ingredients on hand. It was simple, and tasted divine. We've now had it a few times. I've tried once with the home made sauce, and once with store bought. Both were good; home made was better. I would love to make it with fresh tomatoes one day too, instead of canned. I placed the chicken on some pasta with extra sauce and served with a salad.

Here is the recipe.

Below, I copied and pasted directly from the link. All photos are from www.exclusivelyfood.com.au :


Tender pieces of crumbed chicken are topped with homemade tomato sauce and grated cheese, and then oven baked until the cheese is golden and melted. The tomato sauce and crumbed, uncooked chicken can be prepared in advance but it is best to cook the chicken and assemble the dish just before it goes into the oven.

Serves 4-5.

Tomato Sauce

Makes about 1 1/3 cups.

20ml (1 tablespoon) oil
1/2 medium onion, peeled and finely chopped
2 large garlic cloves, peeled and crushed
400g can crushed/diced tomatoes
1/2 teaspoon dried basil
1 1/2 teaspoons brown sugar, firmly packed
Salt and pepper

Crumbed Chicken
400g skinless chicken breast fillets or tenderloins
2 eggs
20ml (1 tablespoon) milk
50g (1/3 cup) plain flour
About 150g (about 1 1/3 cups) packaged breadcrumbs
About 125ml (1/2 cup) oil, for frying

Cheese Topping
140g (1 1/3 cups, firmly packed) grated mozzarella cheese
40g (1/2 cup, lightly packed) grated tasty cheddar cheese
22g (1/4 cup) grated parmesan cheese

Heat oil in a heavy-based medium saucepan over medium heat. Add onion and garlic and cook, stirring occasionally, for about 5 minutes, until onion has softened but not browned. Add tomatoes, basil and brown sugar, increase heat and bring to the boil. Once boiling, reduce heat and simmer for about 35-40 minutes, stirring occasionally, until sauce has reached the desired consistency. Add salt and pepper to taste. Set aside for 10 minutes, and then puree sauce in a blender or food processor.

Trim any fat from chicken. If using chicken breasts, cut them in half horizontally. Cover chicken with a freezer bag and lightly pound with the flat side of meat mallet to flatten. © exclusivelyfood.com.au

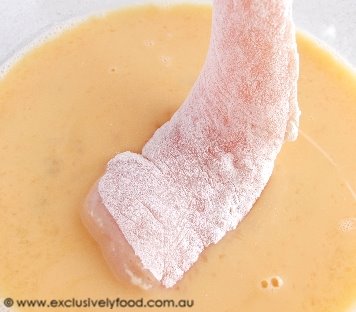
Whisk eggs and milk together in a bowl. Coat one piece of chicken in flour and shake to remove excess. Then dip the chicken into the egg and milk mixture ensuring that all of the flour is moistened.

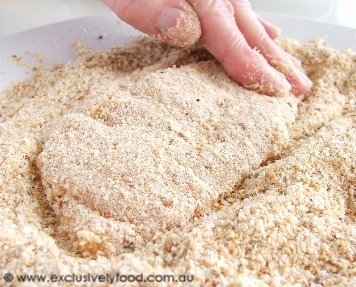
Then coat the chicken in breadcrumbs, pressing firmly to ensure crumbs adhere. Repeat with remaining pieces of chicken.


To fry chicken, heat some of the oil in a heavy-based frying pan over medium-high heat. We cook the chicken in two batches using 1/4 cup of oil for each batch (the number of batches will be determined by the size of your frying pan and you'll need to divide the oil evenly between each batch). Fry the chicken in a single layer, without overcrowding the pan, until golden brown and cooked through.

Wipe the pan out with paper towels between each batch of chicken to remove any crumbs. This prevents the overcooked loose crumbs adhering to the next batch of chicken.

Drain cooked chicken on paper towels.

Place cooked chicken in a large baking dish and spread with sauce. Sprinkle with combined cheeses.

Bake at 200 degrees Celsius (180 degrees fan-forced) for about 15-20 minutes, or until cheese is melted and golden. We sprinkle the chicken parmigiana with chopped parsley before serving. © www.exclusivelyfood.com.au


Read more...

Friday, March 19, 2010

Red Velvet Cake


I've been wanting to try this for ages now. Whenever I read a cupcake blog, people comment on how red velvet is their favorite. I figured I must be missing out on something amazing. I did some research, but I always go back to my trusty Bakerella. I used her recipe, since I've really enjoyed her other cake recipes. I halved it, since we just never eat as much as I think we're capable of (I even gave half away, and still had to throw away left overs). I should have maybe quartered it (though the ratios might not be right at such a small percentage). But I know I should have at least then baked it in 3 or more layers. My oven! I just can't complain enough about it. IT WILL NOT BAKE ANYTHING DENSE. I need this pounded into my skull. Needless to say, I ended up, yet again, with a soggy centre, and burned top.

The cake was good. Not amazing. Hubby really liked it, but I think it's the cream cheese icing that does it. I'm not the hugest cream cheese fan, so honestly, I prefer a trusty white or chocolate cake with buttercream icing. No need to get beyond kids birthday party cake for me.

The only adjustments I did was use a few drops of gel paste food colouring (instead of a bottle or liquid), and I decreased the cream cheese in the icing. I also sprinkled coconut on top, which I think made the cake so much better. I might try this recipe again in cupcake version, or more layers next time.

Read more...